


Transfers for Spacemarines and other Warhammer models
- Michael Twycross
- Feb 24, 2021
- 6 min read

Updated: Mar 3, 2021
So you have just finished painting your Space Marines or some other model you’ve been working on, the bases are done, you're super happy, but you know some transfers would make your models look even better.
“I wish I knew how to use transfers and make them even better” you say...
I CAN HELP YOU!
Transfers are great for adding extra detail and character to your models without having to spend all that time trying to paint it on. It also guarantees a uniform look across your units which would be difficult to do with just a brush and let's face it, we want to get our models finished quickly so we can PLAY SOME GAMES, but still look good.
I’m going to show you how you can easily apply transfers and make them look so amazing, it will impress your mum. All it takes is some patience and practice and you’ll soon want to put transfers on EVERYTHING.
In this article I’m going to go through:
What you need
What are transfers
How to use them
Placing them on your model
Making them look good
Finishing off the transfers
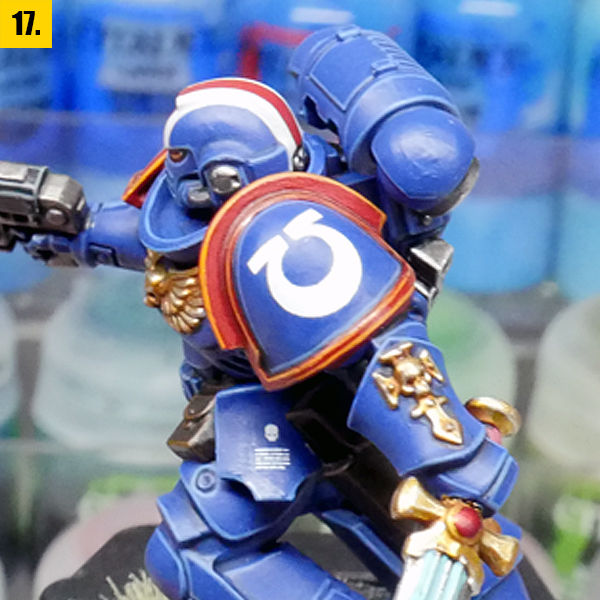
WHAT YOU NEED
These are the things I use when I want to put transfers onto my models (1). You want to start with a cutting mat(a) if you don’t want to damage your desk or table surface. A craft knife(b) or scissors to cut the transfers from the sheet, some water(c) which is going to release the transfers from the backing paper and to also help in placing and cleaning the transfers later in the process.

You will need a brush(d) (any medium sized one will do, preferably not your best brush though) and a drybrush(e) (for a little trick I will share with you at the end) and some kitchen towel(f) and cotton buds(g) ALWAYS come in handy.
You’ll also need some gloss varnish, I have ‘ARDCOAT(h). MICROSET(i) which is really important for making the transfers look good and finally some Lahmian medium(j).
“Always keep hold of your transfer sheets, you never know when you’ll need them”
WHAT ARE TRANSFERS
Transfers are also known as Decals to those who are into scale modeling. They are designs printed onto paper in a way they can be released with water to put on your models, kind of like those fake tattoos you got as kids. You will usually find a transfer sheet(2) in a model kit where the designs on that sheet will be useful or specifically designed for it.


When you look at the sheet, you’ll notice each of the transfers are separate and have a clear border that stands out around them(3). This marks out the transfer and shows what will be released from the backing paper, which means you don’t have to cut around the design to use them, making it so much easier.
HOW TO USE THEM
The first thing to do is to choose what transfers you want to use and cut them from the transfer sheet(4), you don’t want to be releasing all the transfers from the sheet I’m sure. If the designs are next to each other, I cut them out as blocks(5) to keep things organized and it's just easier to keep track off.


Next you need to release the transfers from the backing paper. You can do this in multiple ways(6), from dipping them into your water to leaving them to soak in a shallow container of water, find whatever works best for you. I like to place them on some kitchen paper and use a brush loaded with water.


However you do it, just make sure the water soaks all through the backing paper. You can see this happening as the backing paper will become darker when wet(7) The transfers should take a couple of minutes to release and you will know they are ready to use because you should be able to slide them around on the paper.
PLACING THEM ON YOUR MODEL
I know, I know. You’re super eager to place the transfers on your model, but we need to get the surfaces ready first. The transfers will work best if they have a smooth even surface to sit on and for that I use ‘ARDCOAT(8) which is a gloss varnish. This will act as kind of a filler to cover imperfections and scratches that may be on the surface.
You will need to paint this on the entire area or panel the transfer is going to be placed on. This will prevent any difference in the appearance in the finish, you don’t want to see those awful tide marks around your beautifully applied transfers do yah? Let the varnish dry.

Tip: you can add a little bit of water if you think the ‘ARDCOAT is too thick
Understand that transfers can be really tricky to place on your model, so to make things easier for yourselves, you can put some water onto the surface and use a wet brush when placing the transfer(9). This will give you some time to move the transfer around until you're happy with the placement.

Tip: look at your model from different angles to check the placement of your transfer, especially if you want it centered.
MAKING THEM LOOK GOOD
Once the transfers have dried, you may see they have wrinkles and are not sitting flat against the surface(10). This is why I use MICRO SET(11) and I know MICRO SOL exists but I find this is just a stronger version of MICRO SET and I have found it can damage your paint finish if you're not careful, so i like to stick to just using MICRO SET.


MICRO SET is a solution that will soften your transfers and help them conform to the surface which they’re on, including over rivets and other awkwardly shaped surfaces. It will also thin them out hiding the clear film they are printed on which will help make them look painted or printed on and less like stickers(12). It will also set the transfer in place so it doesn’t move around.
I tend to dab this on and around the transfer using a brush making sure it’s covered. You may need to apply it more than once, just make sure it's dried before applying another coat.


After all of that effort, you may still find little bubbles and wrinkles in the transfer and you think to yourself ‘it could do with using a cotton bud to help flatten the transfer and get rid of those little wrinkles and bubbles” and you would be absolutely correct in thinking that.
So get yourself a cotton bud, making sure it has a moist tip ….ladies, you want to use a rolling motion over the transfer to press it down and get rid of those unsightly wrinkles and bubbles(14).
Using all that MICRO SET will leave residue on your model, so before we move on, you need to clean all the areas off with some water, using a brush or cotton bud.
FINISHING OFF THE TRANSFERS
You’re nearly there, just a couple more things to do and you’ll have amazing looking transfers.


Because we used ‘ARDCOAT to prepare the surfaces for the transfers, they are very glossy(15) and don’t match the finish of the model and that is why I use Lahmian medium(16), it has the same consistency and finish as the citadel paints and brings the areas back to a matt finish to match the rest of the model(17). Paint this over all the areas you painted the gloss varnish, it may take a couple of coats to get rid of that glossiness.
Tip: once the Lahmian medium has finished drying, I like to use a drybrush to buff those areas giving them a nicer finish.
YOU SHOULD NOW HAVE AMAZING LOOKING TRANSFERS. WELL DONE!
I know I’ve gone through a lot, but I hope I’ve helped you on your journey to better transfers. Remember this is just a guide and there are lots of ways to do transfers, and the best thing to do is practice and find what works for you. I just wanted to show you how I do them.
There is a video to go along with this article, so make sure you go check it out, maybe it will help get your head around the process.

Thanks for reading, I hope you have a fun time practicing and I'll catch you next time, Michael.
Comments